Schemas & prompts
This tab defines what to extract (the schema) and how to instruct the LLM (the prompt). It has two sub-tabs: JSON Schemas and Extraction Prompts.
The schema is injected automatically
You do not paste the schema JSON into your prompt. The selected schema is automatically included in the LLM call when an extraction runs.
Schemas
A schema is a JSON schema describing your desired output structure — nested objects, arrays, and every JSON type.
The schemas list
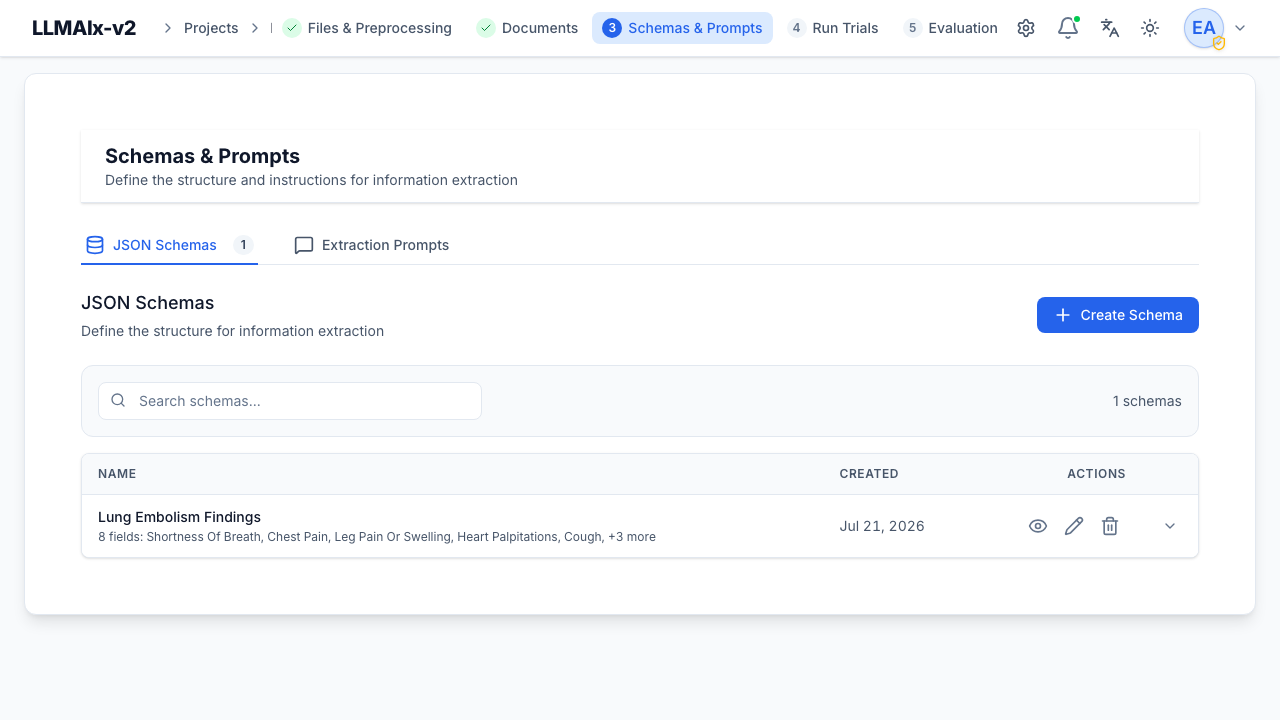
The JSON Schemas section lists every schema in the project. A search box filters by name, and each row shows the Name (with a one-line field summary beneath it) and its Created date. Rows are expandable — click one to preview its fields inline without opening the full editor. Row actions are View, Edit, and Delete.
Creating a schema
Create Schema opens a full-screen editor with a Simple / Advanced toggle in the header. New schemas are pre-seeded with a few starter medical fields. A validity pill next to the name shows Valid / Invalid — a schema is only saveable once it parses to an object with at least one field. A short mode-hint line under the name explains what the current mode does.
Use Templates (available in both Simple and Advanced modes) for common medical structures. Editing an existing schema opens the same editor pre-filled.
Unsaved changes are guarded
Closing the editor with unsaved edits prompts a Discard unsaved changes? confirmation. Switching modes or tabs re-serializes the same schema and does not count as an edit.
Templates
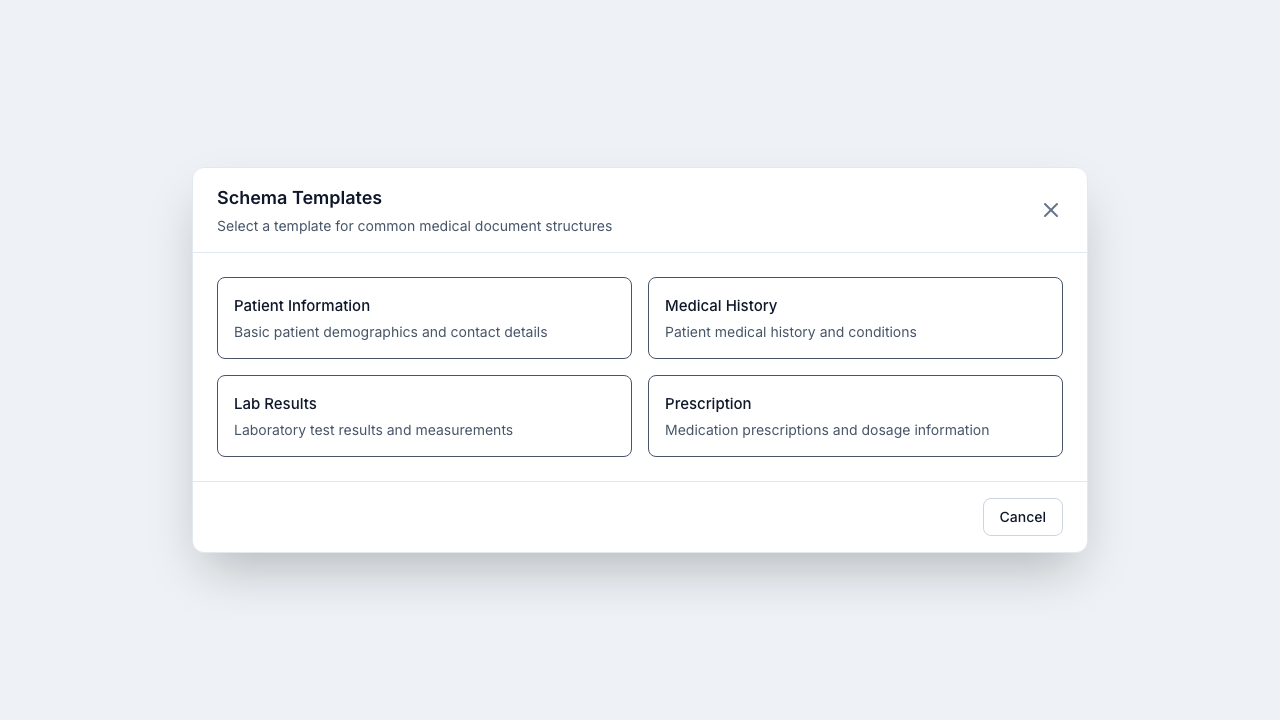
The Templates picker offers four ready-made structures — Patient Information, Medical History, Lab Results, and Prescription — that demonstrate nested objects, arrays of objects, enums, and formats. Applying a template replaces the current name and definition with the template's.
Simple editor
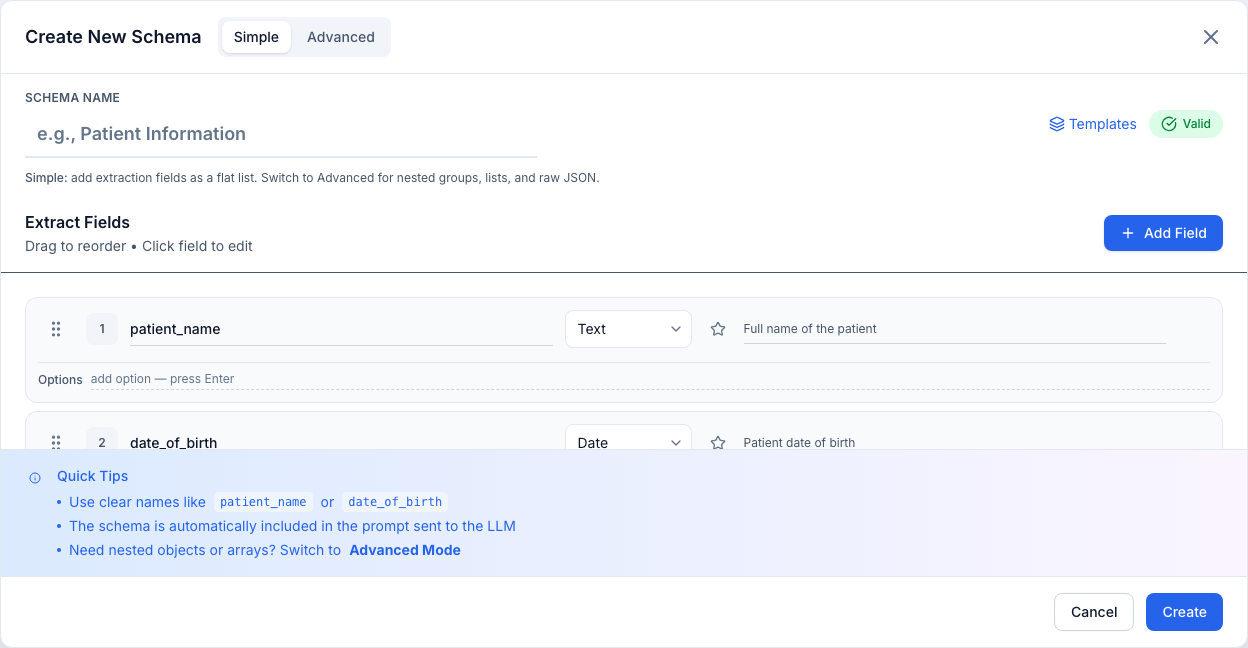
A flat, drag-to-reorder list of fields, driven by an Add Field button (and a matching empty state for a brand-new list). Each editable field row has:
- A drag handle (grip) — press and drag to reorder; dragging is armed only while the handle is held, so selecting text inside the inputs still works.
- A field number badge.
- Field name (e.g.
patient_name). - Type — Text, Number, Integer, Yes/No, Date, Date & Time, Email.
- Required — the star toggle (adds the field to the schema's
requiredlist, telling the LLM the value must be present). - Description (shown on wider screens).
- A remove button (appears on hover).
- Options (Text fields only) — a list of allowed values (a string enum). Type a value and press Enter or comma to add it; Backspace in the empty input removes the last chip; click a chip's × to remove it.
Empty or duplicate field names are flagged inline in red and block saving (they'd otherwise be silently dropped or overwritten). A Quick Tips footer reminds you of naming conventions and points to Advanced mode for nested data.
Advanced fields are read-only here
Fields the simple editor can't represent losslessly — nested groups, lists, non-text enums, string enums that also carry a format, length/number constraints, unknown formats — appear as locked amber rows with a lock icon and a "edit in Advanced" hint. They are preserved untouched on save; switch to Advanced to edit them. A warning callout at the top of the list notes when read-only fields are present.
Advanced editor
Advanced mode replaces the flat list with two tabs plus extra toggles in the header:
- Visual Editor — a navigable tree of blocks (see below).
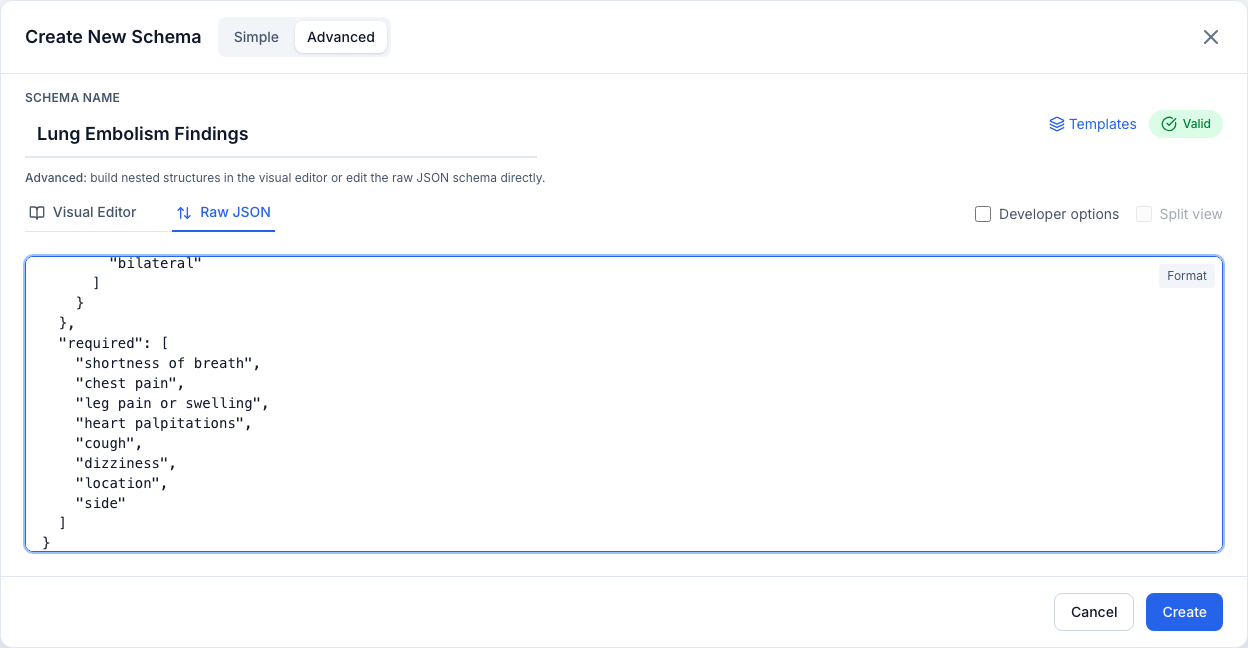
- Raw JSON — a JSON editor with a Format button that pretty-prints and re-syncs the visual tree.
- Split view — show the visual editor and raw JSON side by side. It only applies to the Visual Editor tab (it's disabled on the Raw JSON tab, which is already the JSON pane).
- Developer options — switch labels to JSON-Schema type names (String, Number, Boolean, Object, Array) and expose extra per-field settings.
The visual editor supports arbitrarily deep objects (groups of fields) and
arrays (lists, including lists of objects). A breadcrumb toolbar and a
collapsible Structure tree on the left let you navigate into nested objects
and array items; a keyboard shortcut (N) adds a property to the current
block. Adding, editing, renaming, or deleting a property is done through
dedicated modals, and a Help modal documents the available types.
The property editor exposes type-specific settings:
- Text — min/max length, format (email, URL, date, date-time, time, IPv4/IPv6, UUID), regex pattern, allowed values (enum).
- Number — min/max, multiple of, Integer only.
- List (array) — min/max items, items must be unique, and the type of its items (including objects).
- Group (object) — which child fields are required, and (developer mode) whether to allow additional properties.
- Additional — default value, read-only flag, examples.
Property keys must be valid identifiers (letters, numbers, underscores; not
starting with a number). Renaming a property keeps its place in the parent's
required list.
Validation on save
Saving a schema checks two things, and refuses the save if either fails:
- The definition is valid JSON Schema.
- Every name in a
requiredlist is actually defined in the same object'sproperties.
The second check matters more than it looks. Structured output (the constrained
decoding your LLM endpoint applies) builds its grammar from properties and
silently ignores a required entry that names no property — so the model
returns output the endpoint considers correct, and LLMAIx then rejects it with
'<field>' is a required property for every document in the extraction run. The usual
cause is a property renamed or removed by hand in the Raw JSON editor while
its old name stayed in required; the error message names the offending field
and suggests the closest matching property.
The same check runs when an extraction run is created, so a schema saved before this validation existed fails fast instead of consuming a full run's worth of tokens.
Viewing, editing, deleting
View Schema shows the fields (with a raw-JSON toggle and a Copy button that copies the formatted JSON). A schema embedded in an extraction run is shown with a Snapshot badge, indicating a point-in-time copy rather than the live schema. There is no separate file import/export — the Raw JSON editor is how you paste a schema in, and Copy is how you take one out.
Note
A schema referenced by an extraction run cannot be deleted.
Prompts
A prompt tells the LLM how to extract. Prompts pair a system prompt (the model's role and rules, applied to every document) with a user prompt (per-document instructions).
The prompts list
The Extraction Prompts section lists every prompt, with a search box that matches name and description. Each row shows the Name (with description beneath), a Placeholder column, and the Created date, and expands to preview the system and user prompt text. The Placeholder column shows a green Contains {document_content} badge when the prompt embeds the placeholder explicitly, or an Auto-injected hint (with a tooltip) when it doesn't — in which case the document text is appended automatically at extraction time. Row actions are View, Edit, and Delete.
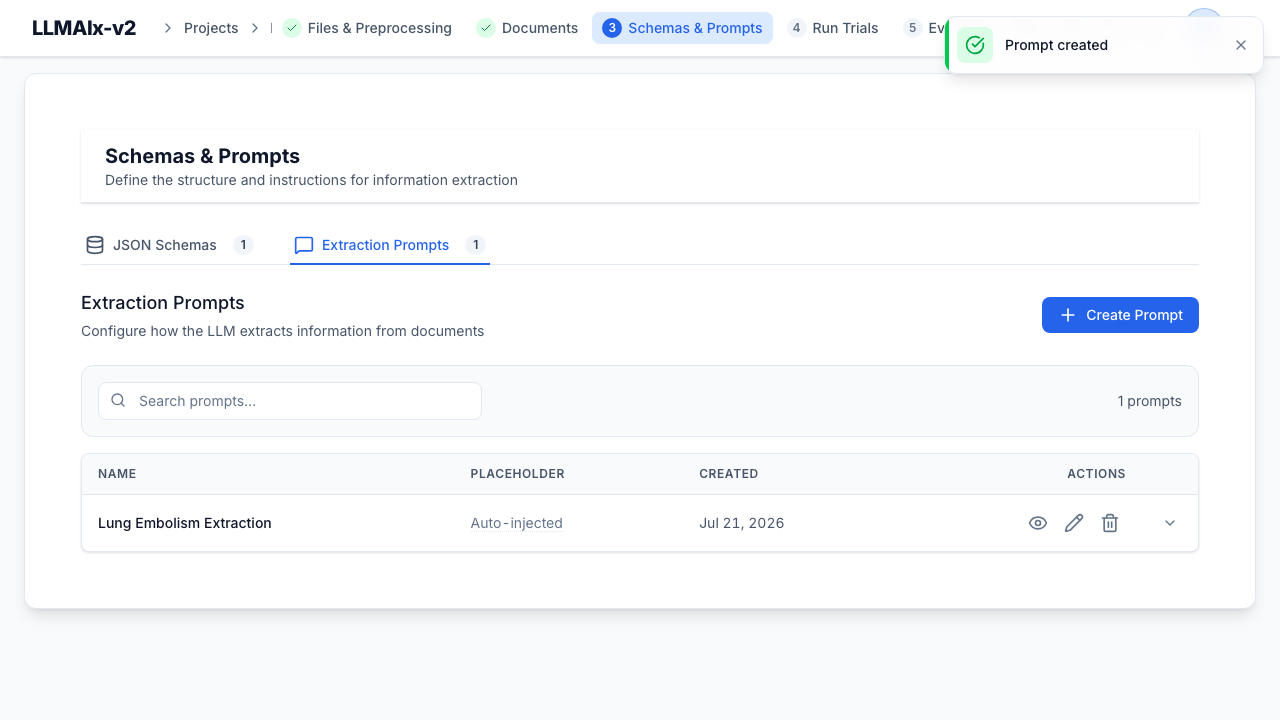
The document-content placeholder
Where you write {document_content}, the document's text is substituted in. If
your prompt doesn't contain the placeholder, the document text is appended
automatically at extraction time (shown as the Auto-injected hint in the list).
Creating a prompt
Create Prompt opens an editor with a Simple / Advanced toggle. Every prompt needs a Name (required) and may have an optional Description.
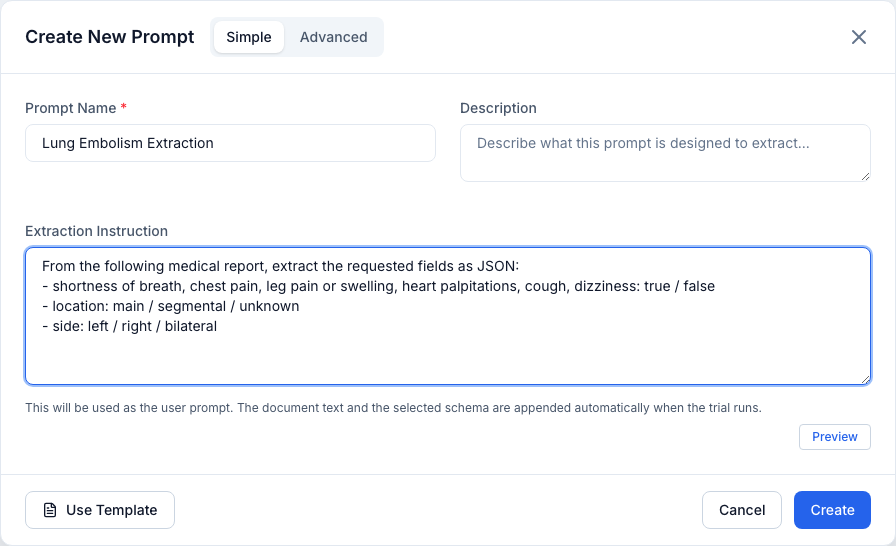
- Simple — a single Extraction Instruction (used as the user prompt); no system prompt is sent. Preview shows the real message the model receives: your instruction, the document content wrapped in markers, and a note that the extraction run's schema is appended after it.
- Advanced — separate System Prompt and User Prompt textareas, each with an Insert {document_content} helper (inserts at the cursor) and a green Contains {document_content} badge when present, plus a per-field Preview that substitutes a sample document. At least one prompt must be present and the placeholder must appear in one of them, or save is blocked with an inline error.
Use Use Template to apply the built-in medical extraction prompt. Because the
template uses a system prompt and an explicit {document_content} placeholder,
it switches you to Advanced mode; if you've already typed anything, a
confirmation guards the overwrite. Closing with unsaved edits prompts a
Discard unsaved changes? confirmation.
The template comes in English, German, French and Spanish, and the selector beside the button follows the interface language — German documents generally extract better with German instructions. It only affects the text the button inserts; you can edit or translate the prompt freely afterwards. The language of the instructions the app appends at run time is set per extraction run (see Advanced settings).
Simple mode drops the system prompt
Saving in Simple mode sends an empty system prompt. The system-prompt text
isn't wiped from the form while you edit — it's only omitted from the saved
payload — so toggling Advanced → Simple → Advanced won't destroy it. Editing
a prompt that already has a system prompt (or an explicit {document_content}
placeholder) automatically opens in Advanced mode so you don't wipe it by
accident.
Note
A prompt referenced by an extraction run cannot be deleted.
Next step
With a schema and a prompt ready, start an extraction run.