Extraction Runs
An extraction run (formerly called a "trial" — the API and database still
use the term trial) runs an LLM over a set of documents to extract structured
data matching your schema. Each document produces one result. This page covers
creating, running, and inspecting extraction runs.
Prerequisites
The Start Extraction Run button is disabled until the project has at least one schema, one prompt, and one document. The button's tooltip tells you which is missing.
Creating an extraction run
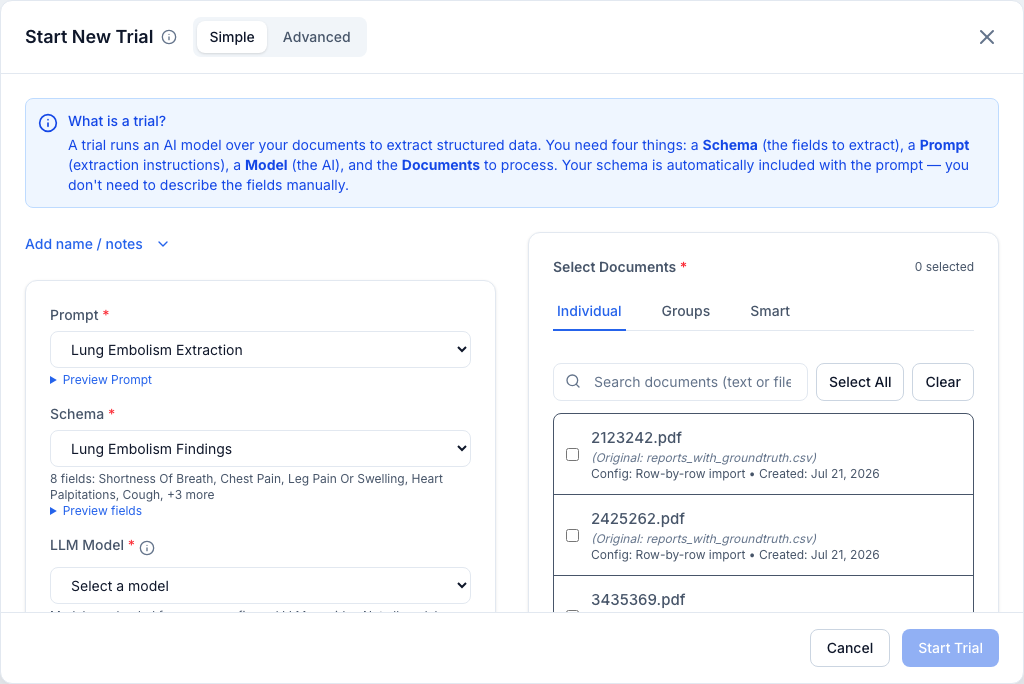
Start Extraction Run opens a dialog with a Simple / Advanced toggle at the top and a "What is an extraction run?" info tooltip next to the title. Four inputs are required, and any of them still missing is outlined in amber:
- Prompt — the extraction instructions. Use Preview prompt to read the system/user templates inline before committing.
- Schema — the output structure. Use Preview fields to inspect the schema's fields inline.
- LLM Model — chosen from the models your endpoint exposes. Not every model supports structured JSON output; see model compatibility.
- Documents — which documents to run over (right-hand panel).
Below the model selector, in both modes, is one optional checkbox:
- Ask for source quotes — off by default. When enabled, the model is also asked to return the verbatim passage each value was read from, which the results viewer uses to highlight sources (see Tracing values back to the document). The quotes are stripped out of the stored result, so the extracted JSON keeps exactly the shape your schema describes and evaluation is unaffected. It roughly doubles output tokens and cost.
An optional name and description can be added below the required inputs. In Simple mode these are collapsed behind an Add name / notes link; in Advanced mode the metadata card is always shown.
The prompt and schema selectors default to the first available of each when the dialog opens. The model selector is pre-filled with the last model this project ran successfully, or with the only model on offer if your endpoint exposes just one; otherwise it stays empty and is marked amber until you choose. A first-run "What is an extraction run?" primer appears above the form and can be dismissed for good — its text remains under the ⓘ next to the dialog title.
Selecting documents
The document panel (required, marked with a red asterisk) shows a running count of how many documents are selected and has three tabs:
- Individual — a searchable, server-paginated list; tick documents one by one. Select All fetches every document matching the current search across all pages (not just the visible page), and Clear empties the selection. Search is debounced and re-queries the backend.
- Groups — pick a single document group to run against its members. Selecting a group loads all of its member document IDs; an empty group warns you. Selecting a second group replaces the first, and clicking the selected group again deselects it.
- Smart — three shortcuts for reusing selections:
- Load from Previous Run — copies the exact document set of a chosen completed extraction run (only completed runs with documents are offered).
- Last 7 days / Last 30 days — selects every document created within that window.
- Filter by Date Range — selects documents created between two dates (end date inclusive).
Advanced settings
In Advanced mode an Advanced Settings section adds three optional tuning inputs (all blank by default, in which case the model's own defaults apply):
- Max Completion Tokens — upper bound on the response length. Only sent when set to a positive integer.
- Temperature — sampling randomness,
0–2. Lower is more deterministic. - Reasoning Effort — Use model default / Low / Medium / High. Only some reasoning models honor this; it is ignored by models that don't.
- Prompt Language — defaults to the interface language. Besides your own prompt text, every request carries instructions the app adds: a notice telling the model to treat the document as untrusted data, the line introducing the JSON schema, and (with source quotes on) the citation rules. These follow this setting, so a German prompt over a German report isn't diluted with English scaffolding. Change it if you run the app in one language and extract in another.
Changing any advanced setting resets the model-compatibility check, so it is re-verified against the new options on submit.
Using a different API
Under Use Custom API Settings you can point the extraction run at any OpenAI-compatible endpoint (OpenAI, Ollama, vLLM, llama.cpp, self-hosted gateways, …) with its own API Key and Base URL. This escape hatch is available in both Simple and Advanced mode. When you edit either field the app debounces, then re-tests the connection and reloads the model list, clearing any previously selected model. If no system endpoint is configured, Simple mode shows a warning prompting you to supply custom settings.
Your API key is protected
Custom API keys are stored encrypted, never returned in API responses, and never included in exports.
Model compatibility
The model list shows the raw model IDs your endpoint reports — appearing in the list doesn't guarantee structured-output support. When you click Start Extraction Run, the app first runs a quick compatibility check (that the model accepts a JSON schema request against your chosen schema) and stops with an explanation if it fails. The dialog's inline status line tells you what is still needed (choose a model, select documents, fix the endpoint) or confirms Verified — ready.
In Advanced mode you can run this check manually from the Model & Schema Compatibility card without submitting, and see the pass/fail reason there. In Simple mode the check runs silently on Start Extraction Run behind a spinner overlay.
Discard protection
Closing the dialog after you've edited any field prompts a Discard changes? confirmation. An untouched open/close (the defaults are pre-filled) closes without prompting.
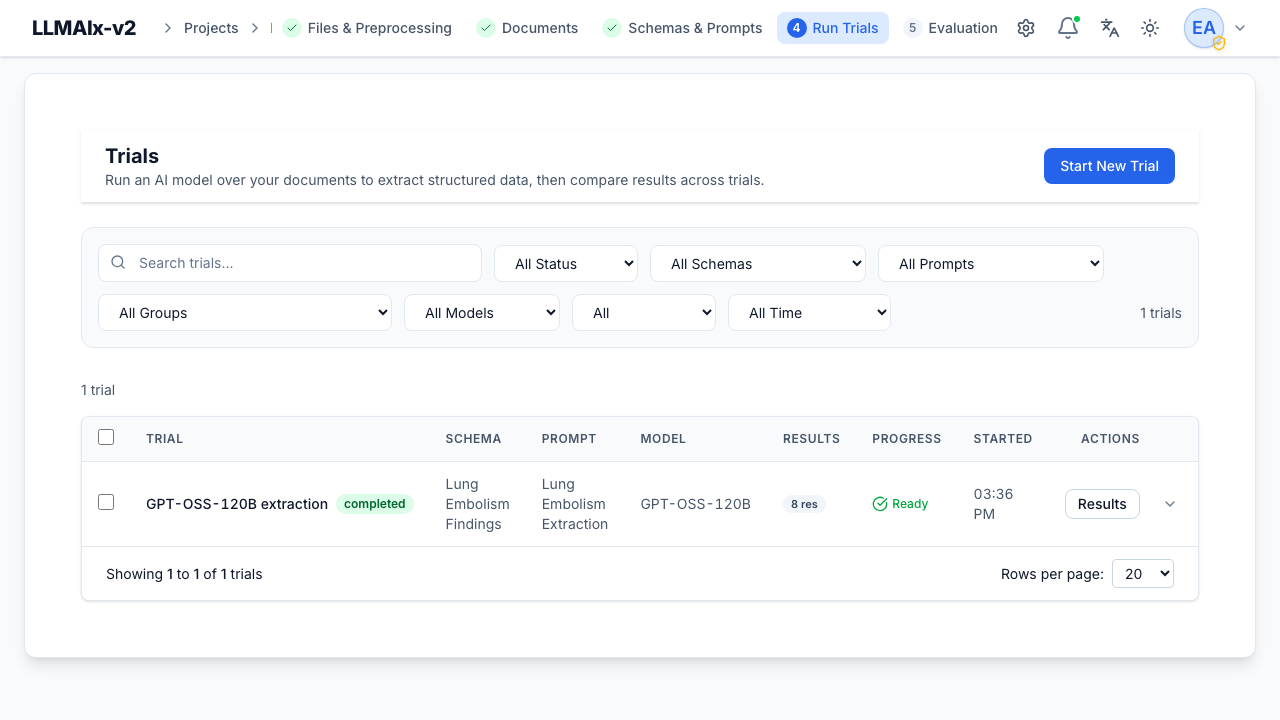
Running, progress, and status
Extraction runs execute as background tasks (or, for admins only, synchronously
via an API-level bypass_celery option). The runs table shows live progress
(done / total) and a status: Pending → Processing → Ready (completed),
Failed, or Cancelled. Progress and status update in real time over a
WebSocket, so you don't need to refresh.
Snapshots are frozen
An extraction run stores a snapshot of the schema and prompt as they were when it ran. Editing or deleting the source schema/prompt afterward does not change what the run displays, exports, or re-runs.
Cancelling
Active extraction runs can be Cancelled. A dialog offers to keep already-processed results.
Partial results on cancel
By default a cancelled extraction run discards its partial results (they are rolled back). Treat cancellation as "stop and throw away", not "stop and keep", unless you know your deployment changed this default.
Retrying failures
Retry clones the extraction run into a new one (preserving the custom endpoint, key, document set, name, and description). If the run had per-document failures you can choose Retry failed documents only or Re-run all documents. Retrying failed-only re-processes just the documents that errored, leaving successful results untouched.
Viewing results
Results opens the extraction results viewer. The header shows the model, prompt, document set, total token usage, and links to the frozen schema/prompt. A left rail lists every document with its result status; you can search it and filter by status:
- Success, Failed, Incomplete, Invalid JSON, Schema invalid, Refused, Provider error.
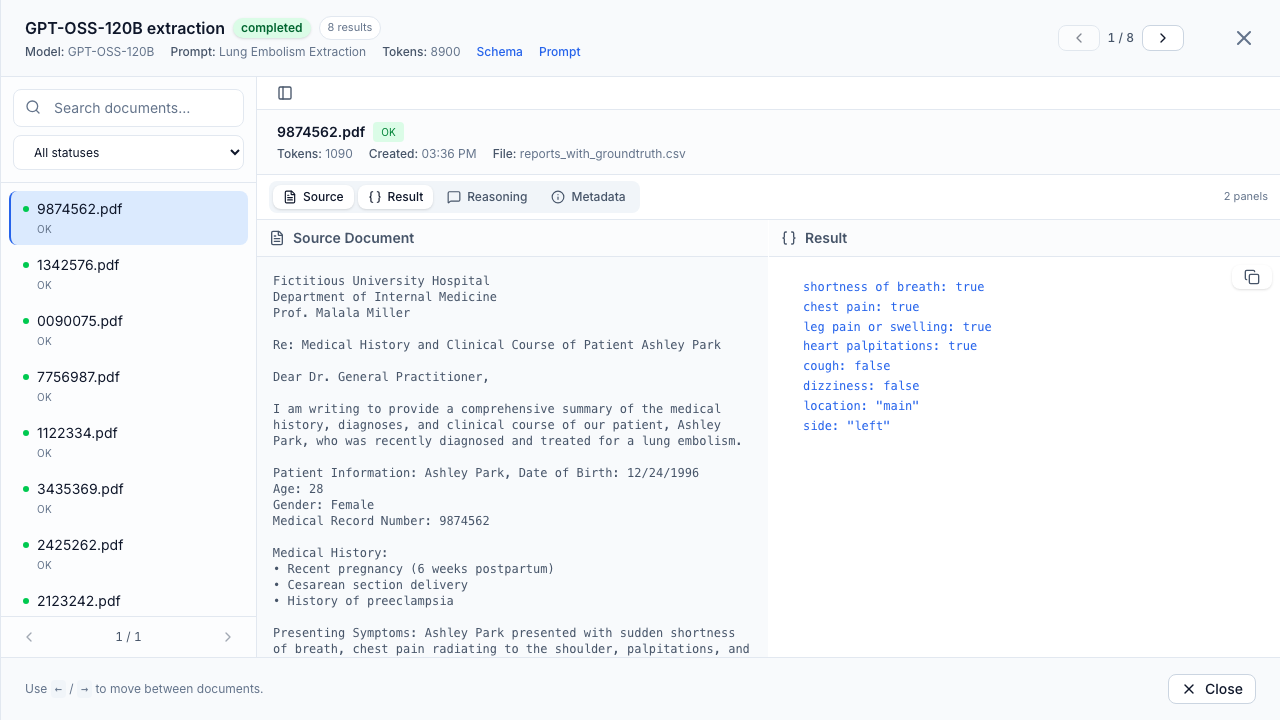
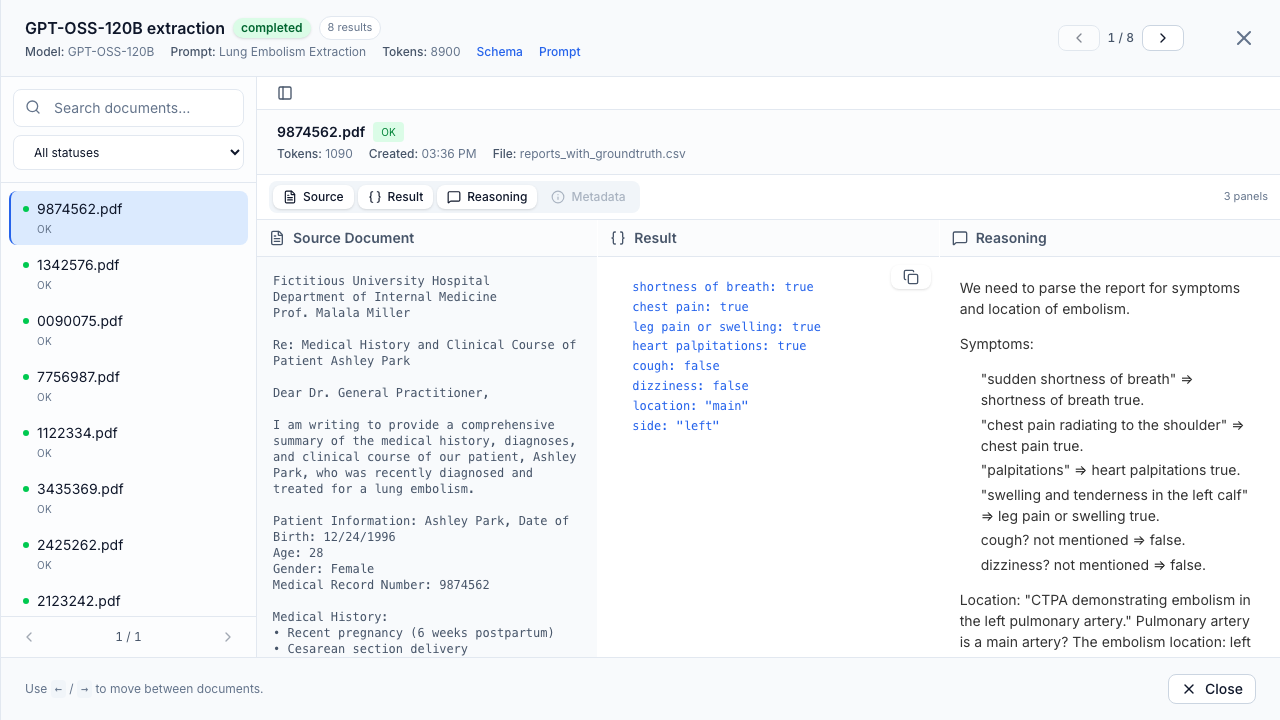
Navigate documents with the header arrows or the ←/→ keys. For each document you can open up to three panels side by side:
- Source Document — the original file preview or the extracted text.
- Result — the extracted JSON (with Copy JSON).
- Reasoning — the model's reasoning content, when present.
- Metadata — token usage, finish reason, and any JSON error.
Failed documents show an error banner with tuning advice (suggested prompt or setting changes). The "{N} errors" header link lists all failures; click one to jump to that document.
A Document view / Table view toggle in the header switches to a cross-document table: one row per document, one column per schema field, so you can scan a single field across the whole extraction run at a glance. Clicking a column header sorts the current page by that column, and clicking a document name jumps back to the document view with that document open; failed documents appear as a single error row. The table pages through the same result set as the document view, and your choice of view is remembered per project.
Tracing values back to the document
Every extracted value in the Result panel carries a small coloured dot. Click the value and the Source Document panel scrolls to the passage the value most likely came from and highlights it. Clicking a highlight works the other way round, selecting the value that passage supports. When a value occurs more than once, a 1 / 3 stepper walks through the occurrences.
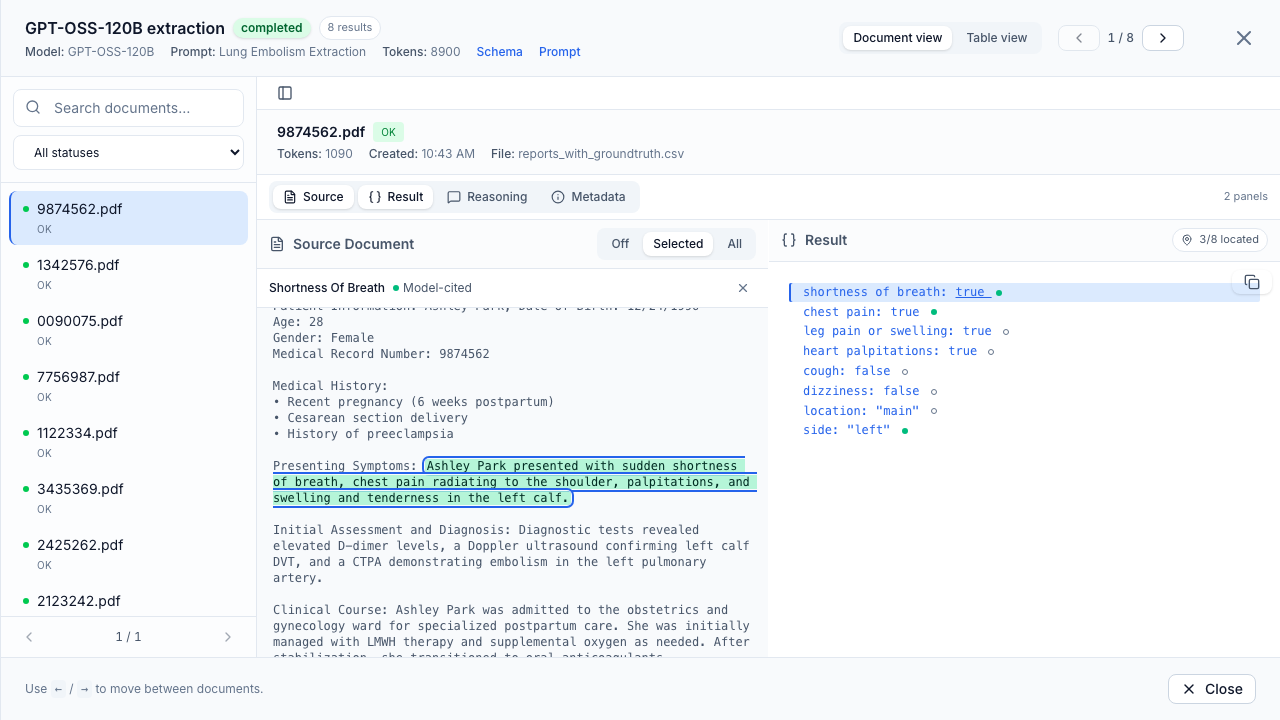
shortness of breath highlights the passage it was read from and names how it was matched ("Field mentioned"). The dots beside each value show its match grade; the header chip counts how many values were located.The Highlight control in the Source panel header switches between:
- Off — no highlighting.
- Selected — only the value you clicked (the default).
- All — every located value at once, colour-coded. Hovering a highlight names the field it belongs to. This is the quickest way to see how much of a document a result actually rests on.
Matches are graded, and the grade is shown on hover, because they are not all equally trustworthy:
| Grade | Colour | Meaning |
|---|---|---|
| Model-cited | green | The model quoted this passage as its source (requires Ask for source quotes). |
| Verbatim | green | The value appears in the text exactly as extracted. |
| Normalized | amber | Found ignoring case, spacing, line breaks, hyphenation or accents. |
| Same number / Same date | amber | The text writes the same value differently (1,234.50 ≡ 1234.5, 03/04/1961 ≡ 1961-04-03). |
| Field mentioned | orange | Only the field name appears — the value itself was inferred. Typical for yes/no fields. |
| Approximate | orange | A similar passage, found by fuzzy matching. Check it manually. |
A value the search cannot place simply carries no dot — the viewer never claims a value is "not in the document". Plenty of correct answers have nothing to quote: a yes/no question answered from the sense of a paragraph, a value the model summarized or derived. Absence of a citation is not evidence against the extraction.
With Ask for source quotes enabled, such a value carries the model's own short note instead — "not mentioned", "inferred" — shown beside it when selected and on hover. The note is the model's claim, not a citation, and is capped at a few words by design.
A stated negative is quoted, not noted: a false read from "denies chest
pain" or "no evidence of embolism" cites that sentence like any other value,
so you can check it. A note therefore means the document is genuinely silent —
which is the distinction that matters when reviewing a negative finding.
The header chip counts how many values carry a citation (9/12 located); hover it for the ones that don't.
Best-effort by design
Except for Model-cited matches, highlights come from searching the extracted text — the model does not report where it read a value. A value without a citation is not necessarily wrong, and a located value is not necessarily right. Treat the highlights as a reading aid for review, not as a correctness check.
Highlighting works on the extracted text, which is what the model was actually given. When the Source panel is showing the original PDF, selecting a value switches it to the text view.
Filtering and managing extraction runs
The filter bar offers search plus Status, Schema, Prompt, Document Group, LLM Model, Errors (Has errors / No errors), and Date Range filters.
- Rename — change an extraction run's name/description.
- Delete — removes the extraction run and its results and any evaluations based on it (running extractions must be cancelled first). Batch-delete via the selection bar.
Downloading results
Download exports results in one of two formats:
- JSON (per-document, ZIP) — one JSON file per document plus
metadata.json. - CSV (table) — one row per document. Bundled into a ZIP when document
content is included; otherwise a single flat
.csv.
The dialog offers three content toggles:
- Include document content — adds each document's extracted text and its source file to the archive. This is what turns a CSV export into a ZIP.
- Include reasoning — adds the model's reasoning content for each result.
- Include token usage — adds per-document token counts.
Sensitive keys (API keys) are always stripped from exports. The download is named
after the extraction run (its slugified name, or trial_<N> when unnamed). For
an unfinished run — one that failed or was cancelled — the export
contains only the successfully extracted documents and is labelled a partial
download, with a note showing how many results are included.
Next step
To measure how good an extraction run's results are, upload ground truth and run an evaluation.